Campaign Builder Goals
Trigger Keap Campaign Builder goals automatically from WooCommerce events.
Overview
InfusedWoo automatically fires Keap Campaign Builder API Goals when events happen in WooCommerce. You can use these goals to kick off campaigns, sequences, and automations inside Keap without any manual work.
Navigate to InfusedWoo > Automation > Campaign Goals to view all available goals and configure settings.
How It Works
- In Keap’s Campaign Builder, drag an API Campaign Goal onto your canvas.
- Set the Integration and Call Name to match a goal from the tables below.
- Publish the campaign.
- When the matching WooCommerce event occurs, InfusedWoo fires the goal automatically.
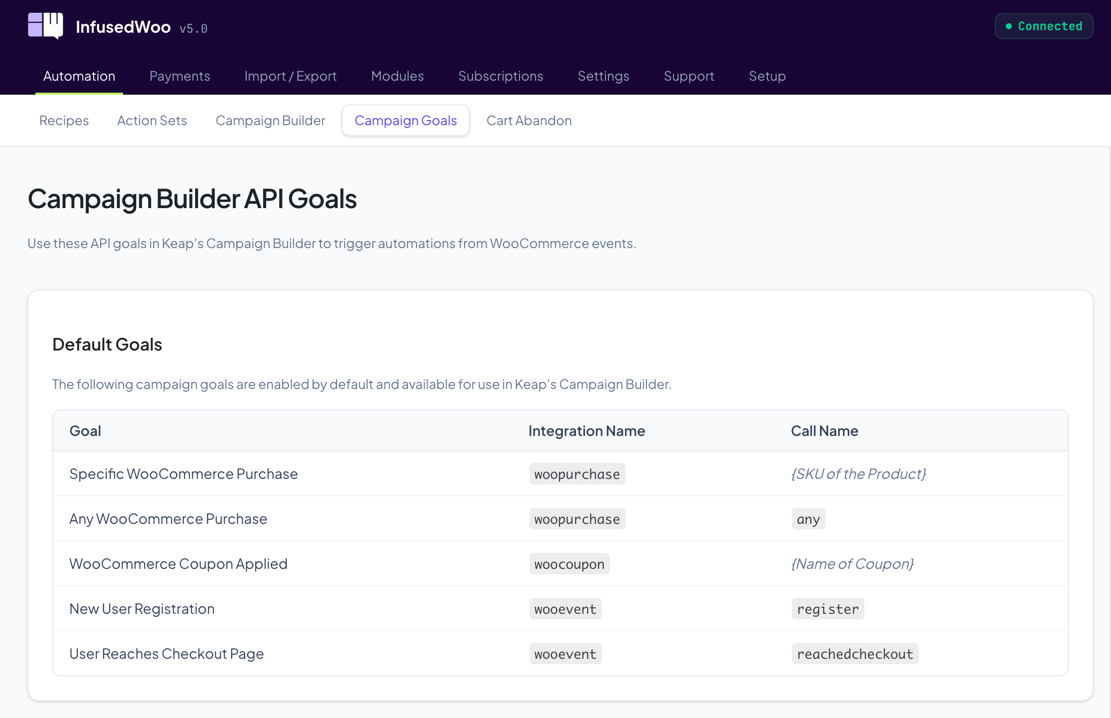
Default Goals
These goals are always active and require no additional configuration:
| Event | Integration | Call Name |
|---|---|---|
| Specific product purchased | woopurchase | {Product SKU} |
| Any product purchased | woopurchase | any |
| Coupon applied | woocoupon | {Coupon name} |
| New user registration | wooevent | register |
| Customer reaches checkout | wooevent | reachedcheckout |
Example
To trigger a campaign when someone buys a product with SKU bluewidget:
- Integration:
woopurchase - Call Name:
bluewidget
To trigger a campaign for any purchase regardless of product:
- Integration:
woopurchase - Call Name:
any
Cart Tracking Goals
Cart tracking goals are disabled by default because they require additional server resources. Enable them in the Cart Tracking section of the Campaign Goals page.
| Event | Integration | Call Name |
|---|---|---|
| Item added to cart | wooaddtocart | {Product SKU} |
| Cart emptied | wooevent | emptiedcart |
Cart tracking only works for logged-in WordPress users.
![]()
WooCommerce Subscription Goals
These goals are available when the WooCommerce Subscriptions plugin is installed:
| Event | Integration | Call Name |
|---|---|---|
| Payment on specific subscription | woosubpayment | {Subscription SKU} |
| Payment on any subscription | woosubpayment | any |
| Subscription activated | woosubactivated | any or {SKU} |
| Subscription cancelled | woosubcancelled | any or {SKU} |
| Subscription suspended | woosubsuspended | any or {SKU} |
| Subscription expired | woosubexpired | any or {SKU} |
Setting Up a Campaign
Follow these steps to connect a WooCommerce event to a Keap campaign:
- Get your product SKU — In WooCommerce, edit your product and note the SKU under the Inventory tab.
- Create a campaign in Keap — Open Campaign Builder and create a new campaign.
- Add an API Goal — Drag the API Campaign Goal tool onto the canvas.
- Configure the goal — Set the Integration to
woopurchaseand the Call Name to the product SKU (oranyfor all products). - Build your sequence — Connect emails, delays, tags, or other actions after the goal.
- Publish the campaign — Unpublished campaigns will not trigger, even if InfusedWoo fires the goal.
Tips
- You can use the same integration and call name combination in multiple campaigns — all matching campaigns will fire.
- Always publish your campaign after making changes. Draft campaigns do not respond to API goals.
- For new automations, consider using Automation Recipes instead. Recipes are more flexible and let you build the entire workflow without switching between WooCommerce and Keap.